


Here you can find the detailed instruction on how to convert data from SQLite database to Microsoft Excel in Exportizer sofware. Exporting data from other database types like Firebird, SQL Server, Oracle, etc is very similar; the difference is in registering the database in Exportizer.
Below, it is shown how to export data directly (from GUI or command line), or using clipboard.
Note: Exportizer also provides the ability to export data to intermediate file formats. For example, you can export SQLite (Firebird, PostgreSQL etc) data to CSV format, and then open the destination .csv file in Excel: it is faster, but has some inconveniences comparing with direct exporting to Excel (e.g. when exporting multiple tables to different sheets of one Excel workbook). Exporting to intermediate file formats is not covered in this topic.
Export Conditions
In most cases, to export from SQLite to Microsoft Excel, the following conditions are required:
- SQLite3.dll must be accessible.
- You can open SQLite database either by Exportizer Pro or by Exportizer Enterprise. If you have created an ODBC DSN for your SQLite database, Exportizer Pro can be used, otherwise Exportizer Enterprise should be used.
- It is important to choose the proper Excel output format:
- When exporting to Excel (OLE) target format, Microsoft Office must be installed; Exportizer and Microsoft Office should be both 32-bit or both 64-bit.
- When exporting to other Excel formats like XLS or XLSX, Microsoft Office is not required, and you can use either Exportizer 32-bit or Exportizer 64-bit.
- When using ODBC on the source side, make sure the Exportizer and the corresponding SQLite ODBC driver have the same architecture (32-bit or 64-bit).
Note: If your operating system is 64-bit, you can install both 32-bit and 64-bit versions of the Exportizer software and use them independently.
Configuring SQLite to Excel Exporting
If you are exporting data via GUI:
- Launch Exportizer Pro or Exportizer Enterprise.
- Register your source SQLite database:
- In Exportizer Pro, use ADO interface. The database must be an ODBC DSN, pointed to your SQLite database file.
- In Exportizer Enterprise, use FD interface. In most cases, specifying a pointer to the SQLite file is enough. Sometimes, specifying the Vendor library parameter may be needed: this must be a main DLL from the folder where SQLite installed, e.g. sqlite3.dll.
Export Steps (GUI)
- Open the registered SQLite database.
- Choose a dataset or datasets to export:
- select a table from the table list;
or - open an SQL window, then write and execute an SQL query;
or - select multiple tables in the table list; before doing that, click Select Tables button
 ;
;
or - prepare a mix of multiple tables and/or SQL queries: open multiple tables one by one and multiple SQL windows; in SQL windows, write your database queries and execute them to get the result sets.
Please note that exporting multiple datasets at a time is available in Exportizer Enterprise only.
- select a table from the table list;
- If your case is a, b, or c, proceed by clicking Export button
 . Otherwise, choose Export | Export Open Datasets... menu.
 - Choose the target Excel format. You have several formats available:
- Excel (XLS). The fastest. Limited to 65535 rows (but there are some workarounds). Does not support data formatting yet.
- Excel (XLSX). The most configurable. The speed is moderate. Allows multiple tables to be written to different sheets of one target file.
- Excel (OLE). The slowest. Requires Microsoft Office installed.
- Excel (XML-based). Fast. For backward compatibility.
Please note that adding data to an existing Excel file is not supported yet.
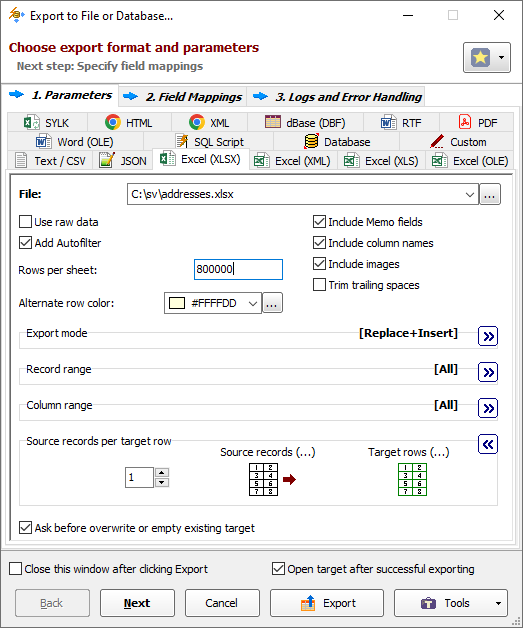
- Specify a target file (for multi-table exporting, you can specify a folder, where the target files will be created) and needed export parameters like sheet name, table title etc.:
Note: If you later need to open the target Excel file in a database tool like Exportizer, make sure to specify the range name for the target table; named ranges help Excel ODBC driver to correctly identify tables inside Excel file.
- Click Next.
Specify the source-to-target table and/or field mappings.
In field mappings, you create the correspondence between the source and target columns. In addition to source table columns, you can also use calculated fields specified by formulas.
In table mappings (for multi-table exporting), you create the correspondence between the source datasets (tables and/or queries) and target Excel files. If you export to Excel (XLSX) or ODS formats, you can specify a different sheet name and table title for each exported dataset. You can also specify nested field mappings for each table pair.
- Click Next to proceed to export logs and error handling options or click Export to start the export process immediately.
Resolving Export Performance Issues
In the case of the slow exporting, the actions you can try depend on used Excel export format:
- Excel (OLE). Please read important notes about this format. Try another export format.
- Excel (XML-based). This format is mainly for backward compatibility. Try another export format.
- Excel (XLS). This is the fastest format. There are quite a few chances for its speed improving. One thing that can be done is to ensure the data source is fast:
- Try to use SQL queries wherever possible.
- If the data source is not to big, try fetch all rows before the exporting. To do this, click Last Record button.
- Excel (XLSX). First, try to optimize the data source (see above) to make sure the problem is something else. Next, consider the data exporting recommendations.
Exporting SQLite to Excel Using Command Line
SQLite to XLSX Command Line Examples
Exporting a table from SQLite file:
"C:\Program Files (x86)\Vitaliy Levchenko\Exportizer Enterprise 10\exptizer.exe" /export /ExportType=EXCELXLSX /ExportMode=REPLACE+INSERT /RowsPerSheet=800000 /SheetName=Employees "/TableTitle=Company Employees" /RangeName=employee /IncludeColNames /IncludeImages /IncludeMemo /SrcDBInterface=FD /SrcDBKind=FILE /SrcDBDriver=SQLITE /SrcDB=C:\MyData\org.db /SrcTableName=employee /TrgDB=C:\TEST\employee.xlsxExporting all tables from SQLite file (one table per Excel file):
"C:\Program Files (x86)\Vitaliy Levchenko\Exportizer Enterprise 10\exptizer.exe" /export /ExportType=EXCELXLSX /ExportMode=REPLACE+INSERT /RowsPerSheet=800000 /IncludeColNames /IncludeImages /IncludeMemo /SrcDBInterface=FD /SrcDBKind=FILE /SrcDBDriver=SQLITE /SrcDB=C:\MyData\org.db /SrcTableName=* /TrgDB=C:\TEST\*.xlsxExporting several tables from SQLite file to one target XLSX file (one table per Excel sheet):
"C:\Program Files (x86)\Vitaliy Levchenko\Exportizer Enterprise 10\exptizer.exe" /export /ExportType=EXCELXLSX /ExportMode=REPLACE+INSERT /RowsPerSheet=800000 /IncludeColNames /IncludeImages /IncludeMemo /TableMappingsFile=C:\TEST\Sqlite2ExcelTableMappings.xml /SrcDBInterface=FD /SrcDBKind=FILE /SrcDBDriver=SQLITE /SrcDB=C:\MyData\org.db /TrgDB=C:\TEST\In the last case, please pay attention to how the source-to-target table mappings are defined. We use /TableMappingsFile parameter which points to an XML file with the mappings definition. For exporting three tables, the file content may look like this:
<?xml version="1.0" encoding="UTF-8"?>
<TableMappings>
  <Items>
    <TableMapping>
      <Source>
        <TableName>employee</TableName>
      </Source>
      <Target>
        <FileName>org.xlsx</FileName>
        <TableTitle>Company Employees</TableTitle>
        <SheetName>Employees</SheetName>
        <RangeName>employee</RangeName>
      </Target>
    </TableMapping>
    <TableMapping>
      <Source>
        <TableName>goods</TableName>
      </Source>
      <Target>
        <FileName>org.xlsx</FileName>
        <TableTitle>Available Goods</TableTitle>
        <SheetName>Goods</SheetName>
        <RangeName>goods</RangeName>
      </Target>
    </TableMapping>
    <TableMapping>
      <Source>
        <TableName>salary</TableName>
      </Source>
      <Target>
        <FileName>org.xlsx</FileName>
        <TableTitle>Position Salaries By Department</TableTitle>
        <SheetName>Salaries</SheetName>
        <RangeName>salary</RangeName>
      </Target>
    </TableMapping>
  </Items>
</TableMappings>
SQLite to XLSX Action File Example
The last command line above can be transformed to an action file, which is much more comfortable to work with. You can run action files either form the command line or from Exportizer GUI. The action file contains all the command line parameters (except /silent switch), one parameter per line, and allows comments:
/export
/ExportType=EXCELXLSX
/ExportMode=REPLACE+INSERT  ;Target files will be overwritten if they exist
/TableMappingsFile=C:\TEST\Sqlite2ExcelTableMappings.xml
/RowsPerSheet=800000
/IncludeColNames
/IncludeImages
/IncludeMemo
/SrcDBInterface=fd
/SrcDBKind=FILE
/SrcDBDriver=SQLITE
/SrcDB=C:\MyData\org.db
/TrgDB=C:\TEST\
Exporting Data Using Clipboard
- Launch Exportizer Pro or Exportizer Enterprise.
- Register your SQLite database.
- Open your registered SQLite database.
- Open the source table or write and execute your SQL query.
- Copy the needed data. You can do this in two ways:
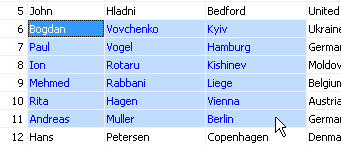
- Quick, but limited. Select a range of cells in a visible part of the data grid, then click Ctrl+C.
- Flexible. Click Copy Data button
 . Choose Text/CSV format, Standard schema, Tab field separator, and specify other options if needed. Then click Copy.
- Quick, but limited. Select a range of cells in a visible part of the data grid, then click Ctrl+C.
- Launch Microsoft Excel and paste the copied data to its sheet.
See also