


What are Calculated Fields?
When exporting a dataset to some destination, it is usually imagined as
SourceTable.Field1 -> TargetTable.Field1
SourceTable.Field2 -> TargetTable.Field2
...
SourceTable.FieldN -> TargetTable.FieldN
But what if we need to export additional columns: not columns representing physical fields from the source dataset, but results of some calculation? For example, getting a sum of several columns, some dates manipulation, or even extracting data from a local file. The common name for these additional fields is calculated fields, and Exportizer Pro and Exportizer Enterprise allow to define and export such fields.
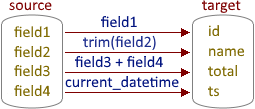
The key point here is to define the calculated fields (i.e., write the corresponding formulas) on the Field Mappings stage of your data export process.
Of course, if you have SQL knowledge, you can do some calculations on the SQL level:
SELECT
  ORDER_ID,
  ORDER_DATE,
  ORDER_SUM,
  ORDER_VAT,
  ORDER_SUM + ORDER_VAT as ORDER_TOTAL,
  TRUNC(SYSDATE) as TS
FROM my_table
In this SQL query, ORDER_TOTAL and TRUNC(SYSDATE) are calculated fields, and, of course, you can use such an approach. Moreover, if you can calculate something by SQL means, do that. But if it cannot be done by SQL, or if you do not have enough knowledge of SQL, Exportizer calculated fields can help.
Practical Steps
There can be two types of calculated columns which significantly differ from each other: database generated columns and Exportizer calculated fields.
Database Computed Columns
Some databases like PostgreSQL, Oracle, SQL Server etc. support so called generated/computed columns. The values of such columns are calculated when selecting their data or when the database row is updated depending on the type of the column (stored or virtual) and the database type.
In Exportizer, you can define such columns on the Field Mappings step. Make sure the target database supports generated columns.
Note: This will work when exporting data using Replace+Insert or Create_or_Replace export modes. In other modes, the generation columns are ignored.
Export steps:
- Open your database.
- Open your source table or SQL query and click Export button
 .
. - Choose the Database export format.
- Specify the target database and export options. Don't forget to specify correct export mode (see above).
- Proceed to the Field Mappings step. Check the mappings.
- Add a new mapping for computed column by clicking Add button.
- In the created mapping row, double-click any target attribute or click '...' button in the second column of the mappings table.
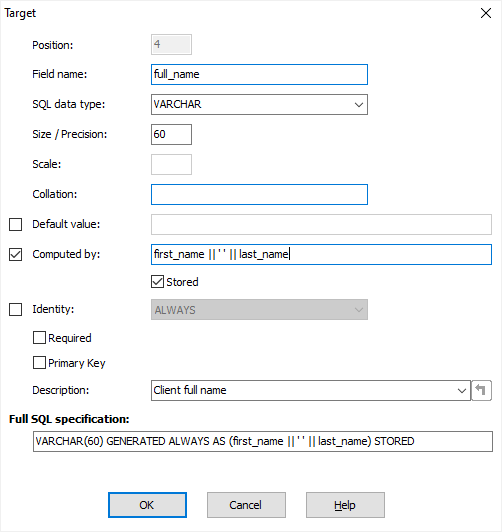
- In the dialog for the target attributes, specify the generation formula in the Computed by field. If you are unsure about the correct syntax, check your database documentation.
Specifying a generated column for PostgreSQL database:
- Click Export.
Exportizer Calculated Fields
Exportizer calculated fields are calculated 'on-the-fly' during the data exporting and can be used either for databases or any other supported destination format. The result of the calculation is written to the target physical database field (when exporting to the database) or to the target file (when exporting to the file format).
Export steps:
- Open your database.
- Open your source dataset and click Export button .
- Choose the needed export format.
- Specify export options.
- Proceed to the Field Mappings step. Here, you specify the correspondence between the source and target fields / columns. The mappings for physical columns are built automatically. And you can add your calculated fields here:
- Click Add button. A new row will be added to the grid.
- Activate the left-most cell of the added row, and click '...' button there. An Expression Builder will appear. Here, you can define the formula for your calculated field. This step might be not so easy for newbies, but once you write your first few formulas, things will look easier. For example, add_date_time( dataset_field_val( 1, 'order_date' ), 5 ) formula will extract order date from the corresponding physical field and add 5 days to it. You might want to see the detailed explanation of all available functions.
- After your formula is ready, click OK, and it will appear in the cell where you clicked '...' button before. Note that the formula is inside a vle_expr macro; it allows the application to distinguish between physical fields and custom expressions.
- Define the target field and its attributes (if any).
- If you need to place your new field in another position among other fields, use Move Up and Move Down buttons.
- Repeat that sequence of actions to add another calculated field, if you need.

- [Optional] Click Save button to save the field mappings to file for future use. Or you might want to save all export definitions (including field mappings and other selected options) by clicking Tools button and choosing Save Export Definitions....
- Click Export and check the results.