


Here you can find the detailed instruction on how to export/convert data from SQLite database to SQL Server database in Exportizer software.
Below, it is shown how to export data from GUI or command line.
Export Conditions
In most cases, to export data from SQLite to SQL Server, the following conditions are required:
- SQLite3.dll must be accessible.
- Exportizer Pro or Exportizer Enterprise must be used.
- When using Exportizer Pro, the source and target databases must be connected via ODBC (using ADO interface), so make sure both SQLite ODBC driver and SQL Server ODBC driver were installed and the corresponding ODBC data sources were created. The drivers must be both either 32-bit or 64-bit.
- When using Exportizer Enterprise, both databases can be connected using FD interface, and there are no ODBC drivers required. Of course, you can use other connection methods available for these types of databases, but note that using FD on the target side can significantly speed up the data exporting.
- All involved components, i.e. Exportizer, ODBC drivers (if you use ODBC on source or target side), OLE DB providers, should have the same architecture: 32-bit or 64-bit.
Notes
- If your operating system is 64-bit, you can install both 32-bit and 64-bit versions of the Exportizer software and use them independently.
- You can invoke the ODBC Data Source Administrator directly from Exportizer (in Open Data Source dialog) when it was launched in administrator mode.
SQLite to SQL Server Conversion Preparation
- Launch Exportizer Pro or Exportizer Enterprise.
- Register your source SQLite database:
- In Exportizer Pro, use ADO interface. The database must be an ODBC DSN, pointed to your SQLite database file.
- In Exportizer Enterprise, use FD interface. In most cases, specifying a pointer to the SQLite file is enough. Sometimes, specifying the Vendor library parameter may be needed: this must be a main DLL from the folder where SQLite installed, e.g. sqlite3.dll.
- Register your target SQL Server database. The recommended interface is FD, but other options are also available. Basically, you specify a server and a database. Note: You can register the target database from the Export dialog during the exporting.
Export Steps (GUI)
Preparing Source Data
- Open the registered SQLite database or drug and drop the source SQLite file onto the Exportizer table list.
- Choose a dataset or datasets to export:
- select a table from the table list;
or - open an SQL window, then write and execute an SQL query;
or - select multiple tables in the table list; before doing that, click Select Tables button
 ;
;
or - prepare a mix of multiple tables and/or SQL queries: open multiple tables one by one and multiple SQL windows; in SQL windows, write your database queries and execute them to get the result sets.
Please note that exporting multiple datasets at a time is available in Exportizer Enterprise only.
- select a table from the table list;
Choosing Target Database and Export Options
- Choose a needed item from Export menu. If you need to export one dataset from the current data window, you can click Export button
 .
. - Switch to the Database tab. If this tab is not visible, click Favorite Export Formats button in the top-right corner of the window and make sure the corresponding format is selected.
- select your registered SQL Server database as a target database. If you did not register it yet, do it now by clicking the '...' button to the right.
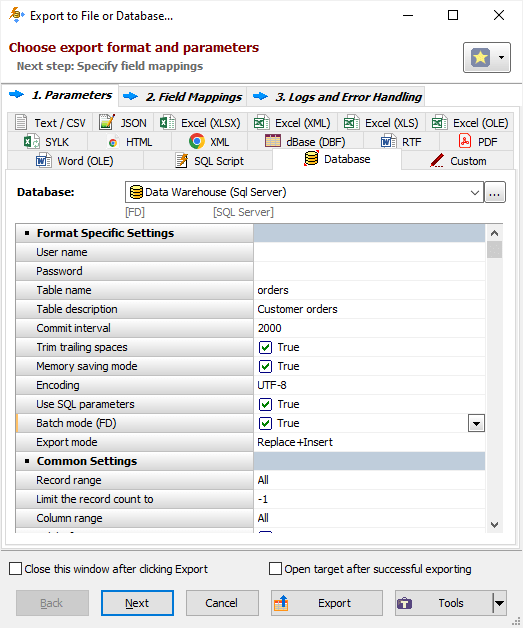
- Specify export parameters:
- Turn on the Memory saving mode option and its related options; they speed up the exporting, especially Batch mode option. In case of exporting problems, if you suspect that they can be caused by these options, try different combinations of them. If exported data or column names on any side can contain Unicode characters, set the corresponding stream Encoding, e.g. UTF-8.
- Specify the Table name, i.e. name of the target table. For multi-table exporting, you can leave it empty, otherwise, all source datasets will be exported to one destination table; anyway, the source-to-target table mappings are available at the next step.
- SQL Server supports optional table descriptions (comments), so you can type a description for the target table; if you are exporting multiple datasets, leave this field empty and fill the descriptions for target tables later on the Table Mappings step. Note that descriptions are applied during the table creation only; they are ignored when the export mode (see below) is appending, updating, or deleting records in existing target table.
- Choose the needed Export mode. For multi-dataset exporting, this mode will be applied to the most of the tables, and you can override it for specific tables at the next (Table Mappings) step. For example, it can be Replace+Insert for the most of tables, and Update or Append+Update for others etc.
- Specify Commit interval. The bigger its value, the faster your exporting process. But too big value may cause memory and other issues. So, try to play with it (starting from a moderate value) to find the optimal value for your database before deploying the solution to your production environment.
Preparing Source-to-Target Mappings
Click Next to proceed to source-to-target table and/or column mappings or click Export to skip the next steps. When skipping the mappings step, all mappings are built automatically, which sometimes is not desired. When proceeding to the mappings step, initial mappings are built automatically too, but they can be edited when needed. It is recommended to use explicitly built mappings when:
- table structure is complex;
- new target columns must be added;
- preparing a command line for data exporting;
- exporting data to already existing tables.
So, when switching to the mappings step, there are two different scenarios depending on how many datasets are involved. If exporting more that one dataset, you work with table mappings, otherwise your work with field/column mappings.
Field Mappings
In field mappings, you create the correspondence between the source and target columns. In addition to source table columns, you can also use calculated fields specified by formulas. It is possible to define full specifications for target columns here, i.e. rename target columns, choose their types, specify NOT NULL constraints, default values, primary key flags, computation formulas, descriptions (comments) etc. These specifications will be applied when the target table needs to be created or overwritten, i.e. when the corresponding export mode is used.
For SQL Server identity or computed columns, the source field or expression (left-most field mappings column) should be empty.

Table Mappings
In table mappings (for multi-dataset exporting), you create the correspondence between the source datasets (tables and/or queries) and target tables. Here, you can specify target table names, their descriptions (comments), and nested field mappings for each table pair.

Logs and Error Handling
Click Next to proceed to export logs and error handling options or click Export to start the export process immediately.
Resolving Export Performance Issues
In the case of the slow performance, there are some actions you can try:
- First of all, make sure the target database is connected via FD interface. Using FD on the target side lets you utilize batch SQL commands execution which can speed up the exporting process drastically.
- Try different combinations of Memory saving mode options and Commit interval setting. It is recommended to turn on the Memory saving mode, Use SQL parameters and Batch mode options and set the value of Commit interval from several hundreds to several thousands depending on you target server resources.
- Finally, you might want to read all the data exporting recommendations.
Exporting SQLite to SQL Server from Command Line
You can create a command line for data migration from SQLite to SQL Server using interface. To do that, make all the preparations described above, then click Tools button and choose Create Action File.... There, you can decide either to use an action file or classic command line. Attention: Before generating the action file or command line, if you are using explicit mappings, save them to a file using Save button, otherwise you will get a shortened version of the mappings and loose many details.
In any case, you can use full command line specification to build the command line manually or to improve the automatically built one.
Command Line Examples
Exporting a table from SQLite to SQL Server in Exportizer Enterprise:
"C:\Program Files (x86)\Vitaliy Levchenko\Exportizer Enterprise 10\exptizer.exe" /export /ExportType=DATABASE /ExportMode=REPLACE+INSERT /FieldMappingsFile=C:\temp\customers_FieldMappings.xml /CommitInterval=2000 /MemorySaving /encoding=UTF-8 /UseSQLParameters /UseBatchMode /TrimTrailingSpaces /SrcDBInterface=FD /SrcDBKind=FILE /SrcDBDriver=SQLite /SrcDB=C:\MyData\cust_data.db /SrcStringFormat=Choose /SrcSharedCache=True /SrcLockingMode=Exclusive /SrcVendorLibrary=C:\sqlite\sqlite3.dll /SrcTableName=customers /TrgDBInterface=FD /TrgDBKind=DSN /TrgDBDriver=SQLSERVER /TrgServer=localhost\SQLEXPRESS /TrgStringFormat=ANSI /TrgDBUserName=sa /TrgDBPassword=sa_password /TrgTableName=dbo.customers /TrgTableDescription=CustomersExporting a table from SQLite to SQL Server in Exportizer Pro (using ODBC on both sides):
"C:\Program Files (x86)\Vitaliy Levchenko\Exportizer Pro 10\exptizer.exe" /export /ExportType=DATABASE /ExportMode=REPLACE+INSERT /FieldMappingsFile=C:\temp\customers_FieldMappings.xml /CommitInterval=2000 /MemorySaving /encoding=UTF-8 /UseSQLParameters /TrimTrailingSpaces /SrcDBInterface=ADO /SrcDBKind=DSN /SrcDBDriver=SQLite /SrcDB=SQLITE_ODBC_DSN /SrcTableName=customers /TrgDBInterface=ADO /TrgDBKind=DSN /TrgDBDriver=SQLSERVER /TrgDB=SQLSERVER_ODBC_DSN /TrgDBUserName=sa /TrgDBPassword=sa_password /TrgTableName=dbo.customers /TrgTableDescription=CustomersAlternative Scenario Using SQL
If you have some reason not to export data to SQL Server directly, you can export SQLite data in Exportizer to SQL file(s) first, and then load data from the file(s) into the target database using Exportizer or an external SQL tool. And, of course, you can export data to SQL script either by GUI or from the command line. We recommend to use Batch Insert SQL statement type for that.
But please note, that when choosing exporting to SQL script, your export process will have two phases: first, exporting the data to SQL script; second, loading data from the script to your target database. So, this way can be less effective, especially for large datasets or when automating the data exporting. Another disadvantage of this way is that BLOB data will not be transferred.
Anyway, you can to try both export scenarios and select the fastest and/or the most convenient one.
See also